
Light
Units
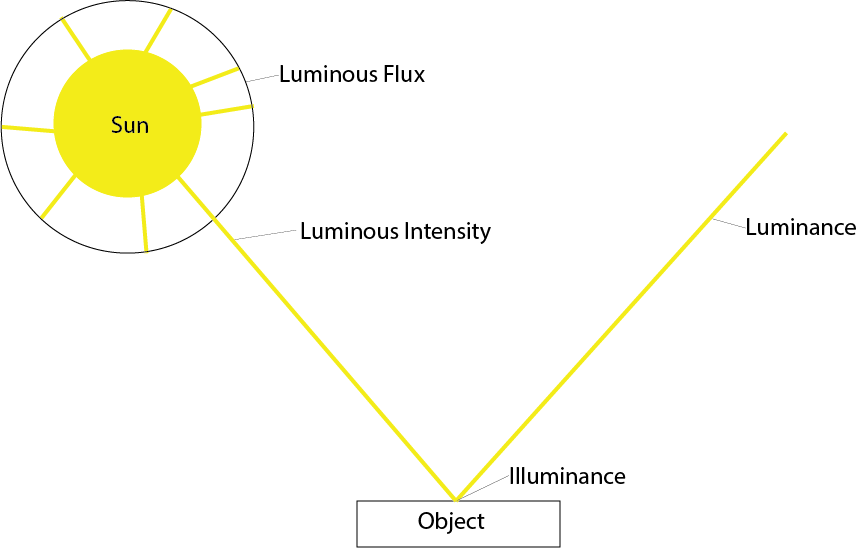
Luminous Flux (光通量)
is
how much light a light source emits, measured in
lumens (lm). This could be the sun, a light bulb, a flash, etc.
Luminous Intensity (發光強度)
is
how much light travels in a certain direction, measured in candelas (cd).
For example, the sun sends out light all over the galaxy,
but chances are we are only interested in the light hitting around us.
Illuminance (照度)
is
how much of that light is hitting an object, measured in lux.
Luminance (亮度)
is
how much light is reflected or emitted by an object or scene, measured in candela per square meter (cd/m²).
Luminance can either be measured for the object or scene
being photographed, or for the final print photo.
Brightness on the other hand, is a judgement call made by a subject looking at an object or
scene, which can be biased. This is usually made by comparing two objects to
determine which is brighter and which is darker.
To better understand the difference, lets look at a cell phone or
tablet screen. Ever noticed how bright your cell phone looks inside, but when
you take it outside in the sun, you can barely see the screen?
A very popular model of cell phones was
measured at 536 cd/m². Inside the house, the screen
looks very bright. But if you bring it outside on a sunny day at noon time, the
sun’s 1.6×10^9 cd/m² luminance will make that same cell phone screen look dark.
Exposure (曝光)
is
a measure of how much of that light reaches the camera per area, which is
affected by the aperture, the shutter speed, and the luminance of the scene or
object. A scene or object can be considered underexposed, if it is too dark,
correctly exposed, or over-exposed, if it is too bright.
Exposure Value (曝光值)
represents
the aperture and shutter speed settings of a camera, and is measured in EV. An EV of 0 represents an aperture of 1
and a shutter speed of 1 second, where 1 EV represents a 1 stop of light
difference.
Interestingly, Exposure Value does not
mention the ISO light sensitivity of the film or sensor, so it is very typical
to describe an Exposure value as 15 EV at ISO 100, which would give a correct
exposure for a sunny scene based on the Sunny f/16 rule where in a sunny scene,
a correct exposure can be obtained with an aperture of f/16 with the ISO and Shutter speed being
equal ( f/16, 1/100 secs,
ISO 100 would work, as well as f/16, 1/2000 sec, ISO 2000).
Light Stops are used to compare
Exposure and Exposure Value, where each stop of light represents double the
intensity of light. Stops can be used to describe the aperture
(光圈), shutter speed, and ISO
settings used to take a photo, and are usually used in full stops, half stops,
or third stops.
A stop is a doubling or halving of the
amount of light let in when taking a photo.

above is a photo with 1 stop up and 1 stop down.
STOPS
AND ISO SPEED
ISO speed describes how sensitive your
camera's sensor is to the light that hits it. A more sensitive sensor will
produce the same overall exposure from less light, meaning that you can use a
narrower aperture or faster shutter speed in the same conditions.

Common ISO speed stops.
ISO is measured using values that
correspond to the ASA scale for film, with a higher ISO number relating to a
more sensitive sensor. As with shutter speed, doubling the ISO number gives an
increase of 1 stop, while halving gives it a decrease of 1 stop.
For example, switching from ISO 100 to ISO
200 doubles the sensor's sensitivity, producing a 1 stop increase. Moving from
ISO 800 to ISO 400 is a 1 stop decrease. Most cameras let you change ISO
speed in increments of 1 stop.
STOPS
AND APERTURE DIAMETER
Aperture is measured using the
"f-number", sometimes called the "f-stop", which describes
the diameter of the aperture. A lower f-number relates to a wider aperture (one
that lets in more light), while a higher f-number means a narrower aperture
(less light).

Common aperture stops.
Because of the way f-numbers are
calculated, a stop doesn't relate to a doubling or halving of the value, but to
a multiplying or dividing by 1.41 (the square root of 2). For example,
going from f/2.8 to f/4 is a decrease of 1 stop because 4 = 2.8 * 1.41.
Changing from f/16 to f/11 is an increase of 1 stop because 11 = 16 / 1.41.
As with shutter speed, most cameras let you
control your aperture in 1/3 stop increments.
STOPS
ARE INTERCHANGEABLE
The great thing about stops is that they
give us a way to directly compare shutter speed, aperture diameter, and ISO
speed. This means that we can easily swap these three components about while
keeping the overall exposure the same.
Let's say you're shooting a scene using a
shutter speed of 1/60 of a second, an aperture of f/8, and an ISO of 200. You
find that while the scene is well exposed, your subject is turning out a bit
blurry, so you decide to increase the shutter speed to 1/120 of a second.
This change of 1 stop will result in the
next photo coming out dark, because you're now letting in half the total light
as before. In order to correct this, you need to reclaim that 1 stop reduction
from somewhere else. Now that we have a way of comparing settings, this is
simple.
You could open the aperture wider to let in
more light - moving from f/8 to f/5.6 is an increase of 1 stop, so we've got
back to our original exposure. Alternatively you could double the ISO speed
from 200 to 400, again resulting in a 1 stop increase.
As you can see, stops are a really easy way
of adjusting our camera's settings while making sure we don't ruin the photo's
overall exposure.
CONSIDERATIONS
WHEN ADJUSTING EXPOSURE
When adjusting the three components of
exposure you should be aware that each one affects your photos in other ways,
which may not always be desirable:
Shutter speed - If your shutter
speed is too slow your photo may blur, either from movement of the camera or
movement of the subject.
Aperture - A wide aperture
produces a narrow depth of field, so if you make it too wide you may have
trouble keeping everything in focus. On the other hand, a narrow depth of field
can help to isolate the subject, and is often something that you want; if so,
you need to avoid using a narrow aperture.
ISO speed - The more you
increase your camera's ISO, the more digital noise your photos will exhibit.
This can make your image look grainy and reduce its sharpness.
As with everything in photography,
adjusting these three settings is a balancing act. You need to decide what effects you want in your shot and choose settings that will
produce them while minimizing the potential downsides. Exposure stops are a really useful tool for doing this, helping you swap
settings around with ease and giving you more control over your scene.